This version of this article is for using repository custom instructions and prompt files in VS Code. Click the tabs above for instructions on using custom instructions in other environments.
Introduction
Repository custom instructions let you provide Copilot with repository-specific guidance and preferences. For more information, see About customizing GitHub Copilot responses.
Prerequisites for repository custom instructions
-
You must have a custom instructions file (see the instructions below).
-
Custom instructions must be enabled. This feature is enabled by default. See Enabling or disabling repository custom instructions later in this article.
Creating custom instructions
VS Code supports three types of repository custom instructions. For details of which GitHub Copilot features support these types of instructions, see About customizing GitHub Copilot responses.
-
Repository-wide custom instructions, which apply to all requests made in the context of a repository.
These are specified in a
copilot-instructions.mdfile in the.githubdirectory of the repository. See Creating repository-wide custom instructions. -
Path-specific custom instructions, which apply to requests made in the context of files that match a specified path.
These are specified in one or more
NAME.instructions.mdfiles within or below the.github/instructionsdirectory in the repository. See Creating path-specific custom instructions.If the path you specify matches a file that Copilot is working on, and a repository-wide custom instructions file also exists, then the instructions from both files are used.
-
Agent instructions are used by AI agents.
You can create one or more
AGENTS.mdfiles, stored anywhere within the repository. When Copilot is working, the nearestAGENTS.mdfile in the directory tree will take precedence. For more information, see the agentsmd/agents.md repository.Note
Support of
AGENTS.mdfiles outside of the workspace root is currently turned off by default. For details of how to enable this feature, see Use custom instructions in VS Code in the VS Code documentation.
Creating repository-wide custom instructions
-
In the root of your repository, create a file named
.github/copilot-instructions.md.Create the
.githubdirectory if it does not already exist. -
Add natural language instructions to the file, in Markdown format.
Whitespace between instructions is ignored, so the instructions can be written as a single paragraph, each on a new line, or separated by blank lines for legibility.
Creating path-specific custom instructions
-
Create the
.github/instructionsdirectory if it does not already exist. -
Optionally, create subdirectories of
.github/instructionsto organize your instruction files. -
Create one or more
NAME.instructions.mdfiles, whereNAMEindicates the purpose of the instructions. The file name must end with.instructions.md. -
At the start of the file, create a frontmatter block containing the
applyTokeyword. Use glob syntax to specify what files or directories the instructions apply to.For example:
---
applyTo: "app/models/**/*.rb"
---
You can specify multiple patterns by separating them with commas. For example, to apply the instructions to all TypeScript files in the repository, you could use the following frontmatter block:
---
applyTo: "**/*.ts,**/*.tsx"
---
Glob examples:
*- will all match all files in the current directory.**or**/*- will all match all files in all directories.*.py- will match all.pyfiles in the current directory.**/*.py- will recursively match all.pyfiles in all directories.src/*.py- will match all.pyfiles in thesrcdirectory. For example,src/foo.pyandsrc/bar.pybut notsrc/foo/bar.py.src/**/*.py- will recursively match all.pyfiles in thesrcdirectory. For example,src/foo.py,src/foo/bar.py, andsrc/foo/bar/baz.py.**/subdir/**/*.py- will recursively match all.pyfiles in anysubdirdirectory at any depth. For example,subdir/foo.py,subdir/nested/bar.py,parent/subdir/baz.py, anddeep/parent/subdir/nested/qux.py, but notfoo.pyat a path that does not contain asubdirdirectory.
-
Optionally, to prevent the file from being used by either Copilot cloud agent or Copilot code review, add the
excludeAgentkeyword to the frontmatter block. Use either"code-review"or"cloud-agent".For example, the following file will only be read by Copilot cloud agent.
---
applyTo: "**"
excludeAgent: "code-review"
---
If the
excludeAgentkeyword is not included in the front matterblock, both Copilot code review and Copilot cloud agent will use your instructions. -
Add your custom instructions in natural language, using Markdown format. Whitespace between instructions is ignored, so the instructions can be written as a single paragraph, each on a new line, or separated by blank lines for legibility.
Custom instructions in use
The instructions in the file(s) are available for use by Copilot as soon as you save the file(s). Instructions are automatically added to requests that you submit to Copilot.
Custom instructions are not visible in the Chat view or inline chat, but you can verify that they are being used by Copilot by looking at the References list of a response in the Chat view. If custom instructions were added to the prompt that was sent to the model, the .github/copilot-instructions.md file is listed as a reference. You can click the reference to open the file.

Enabling or disabling repository custom instructions
You can choose whether or not you want Copilot to use repository-based custom instructions.
Enabling or disabling custom instructions for Copilot Chat
Custom instructions are enabled for Copilot Chat by default but you can disable, or re-enable, them at any time. This applies to your own use of Copilot Chat and does not affect other users.
- Open the Setting editor by using the keyboard shortcut Command+, (Mac) / Ctrl+, (Linux/Windows).
- Type
instruction filein the search box. - Select or clear the checkbox under Code Generation: Use Instruction Files.
Enabling or disabling custom instructions for Copilot code review
Custom instructions are enabled for Copilot code review by default but you can disable, or re-enable, them in the repository settings on GitHub.com. This applies to Copilot's use of custom instructions for all code reviews it performs in this repository.
-
On GitHub, navigate to the main page of the repository.
-
Under your repository name, click Settings. If you cannot see the "Settings" tab, select the dropdown menu, then click Settings.

-
In the "Code & automation" section of the sidebar, click Copilot, then Code review.
-
Toggle the “Use custom instructions when reviewing pull requests” option on or off.

Enabling and using prompt files
Note
- Copilot prompt files are in public preview and subject to change. Prompt files are only available in VS Code, Visual Studio, and JetBrains IDEs. See About customizing GitHub Copilot responses.
- For community-contributed examples of prompt files for specific languages and scenarios, see the Awesome GitHub Copilot Customizations site.
Prompt files let you build and share reusable prompt instructions with additional context. A prompt file is a Markdown file, stored in your workspace, that mimics the existing format of writing prompts in Copilot Chat (for example, Rewrite #file:x.ts). You can have multiple prompt files in your workspace, each of which defines a prompt for a different purpose.
Enabling prompt files
To enable prompt files, configure the workspace settings.
- Open the command palette by pressing Ctrl+Shift+P (Windows/Linux) / Command+Shift+P (Mac).
- Type "Open Workspace Settings (JSON)" and select the option that's displayed.
- In the
settings.jsonfile, add"chat.promptFiles": trueto enable the.github/promptsfolder as the location for prompt files. This folder will be created if it does not already exist.
Creating prompt files
-
Open the command palette by pressing Ctrl+Shift+P (Windows/Linux) / Command+Shift+P (Mac).
-
Type "prompt" and select Chat: Create Prompt.
-
Enter a name for the prompt file, excluding the
.prompt.mdfile name extension. The name can contain alphanumeric characters and spaces and should describe the purpose of the prompt information the file will contain. -
Write the prompt instructions, using Markdown formatting.
You can reference other files in the workspace by using Markdown links—for example,
[index](../../web/index.ts)—or by using the#file:../../web/index.tssyntax. Paths are relative to the prompt file. Referencing other files allows you to provide additional context, such as API specifications or product documentation.
Using prompt files
-
At the bottom of the Copilot Chat view, click the Attach context icon ().
-
In the dropdown menu, click Prompt... and choose the prompt file you want to use.
-
Optionally, attach additional files, including prompt files, to provide more context.
-
Optionally, type additional information in the chat prompt box.
Whether you need to do this or not depends on the contents of the prompt you are using.
-
Submit the chat prompt.
For more information about prompt files, see Use prompt files in Visual Studio Code in the Visual Studio Code documentation.
Further reading
- Support for different types of custom instructions
- Customization library—a curated collection of examples
- Using custom instructions to unlock the power of Copilot code review
This version of this article is for using repository custom instructions and prompt files in Visual Studio. Click the tabs above for instructions on using custom instructions in other environments.
Introduction
Repository custom instructions let you provide Copilot with repository-specific guidance and preferences. For more information, see About customizing GitHub Copilot responses.
Prerequisites for repository custom instructions
-
You must have a custom instructions file (see the instructions below).
-
The Enable custom instructions... option must be enabled in your settings. This is enabled by default. See Enabling or disabling repository custom instructions later in this article.
Creating custom instructions
Visual Studio supports two types of custom instructions. For details of which GitHub Copilot features support these types of instructions, see About customizing GitHub Copilot responses.
-
Repository-wide custom instructions, which apply to all requests made in the context of a repository.
These are specified in a
copilot-instructions.mdfile in the.githubdirectory of the repository. See Creating repository-wide custom instructions. -
Path-specific custom instructions, which apply to requests made in the context of files that match a specified path.
These are specified in one or more
NAME.instructions.mdfiles within or below the.github/instructionsdirectory in the repository. See Creating path-specific custom instructions.If the path you specify matches a file that Copilot is working on, and a repository-wide custom instructions file also exists, then the instructions from both files are used.
Creating repository-wide custom instructions
-
In the root of your repository, create a file named
.github/copilot-instructions.md.Create the
.githubdirectory if it does not already exist. -
Add natural language instructions to the file, in Markdown format.
Whitespace between instructions is ignored, so the instructions can be written as a single paragraph, each on a new line, or separated by blank lines for legibility.
Creating path-specific custom instructions
-
Create the
.github/instructionsdirectory if it does not already exist. -
Optionally, create subdirectories of
.github/instructionsto organize your instruction files. -
Create one or more
NAME.instructions.mdfiles, whereNAMEindicates the purpose of the instructions. The file name must end with.instructions.md. -
At the start of the file, create a frontmatter block containing the
applyTokeyword. Use glob syntax to specify what files or directories the instructions apply to.For example:
---
applyTo: "app/models/**/*.rb"
---
You can specify multiple patterns by separating them with commas. For example, to apply the instructions to all TypeScript files in the repository, you could use the following frontmatter block:
---
applyTo: "**/*.ts,**/*.tsx"
---
Glob examples:
*- will all match all files in the current directory.**or**/*- will all match all files in all directories.*.py- will match all.pyfiles in the current directory.**/*.py- will recursively match all.pyfiles in all directories.src/*.py- will match all.pyfiles in thesrcdirectory. For example,src/foo.pyandsrc/bar.pybut notsrc/foo/bar.py.src/**/*.py- will recursively match all.pyfiles in thesrcdirectory. For example,src/foo.py,src/foo/bar.py, andsrc/foo/bar/baz.py.**/subdir/**/*.py- will recursively match all.pyfiles in anysubdirdirectory at any depth. For example,subdir/foo.py,subdir/nested/bar.py,parent/subdir/baz.py, anddeep/parent/subdir/nested/qux.py, but notfoo.pyat a path that does not contain asubdirdirectory.
-
Optionally, to prevent the file from being used by either Copilot cloud agent or Copilot code review, add the
excludeAgentkeyword to the frontmatter block. Use either"code-review"or"cloud-agent".For example, the following file will only be read by Copilot cloud agent.
---
applyTo: "**"
excludeAgent: "code-review"
---
If the
excludeAgentkeyword is not included in the front matterblock, both Copilot code review and Copilot cloud agent will use your instructions. -
Add your custom instructions in natural language, using Markdown format. Whitespace between instructions is ignored, so the instructions can be written as a single paragraph, each on a new line, or separated by blank lines for legibility.
Custom instructions in use
The instructions in the file(s) are available for use by Copilot as soon as you save the file(s). Instructions are automatically added to requests that you submit to Copilot.
Custom instructions are not visible in the Chat view or inline chat, but you can verify that they are being used by Copilot by looking at the References list of a response in the Chat view. If custom instructions were added to the prompt that was sent to the model, the .github/copilot-instructions.md file is listed as a reference. You can click the reference to open the file.

Enabling or disabling repository custom instructions
You can choose whether or not you want Copilot to use repository-based custom instructions.
Enabling or disabling custom instructions for Copilot Chat
Custom instructions are enabled for Copilot Chat by default but you can disable, or re-enable, them at any time. This applies to your own use of Copilot Chat and does not affect other users.
-
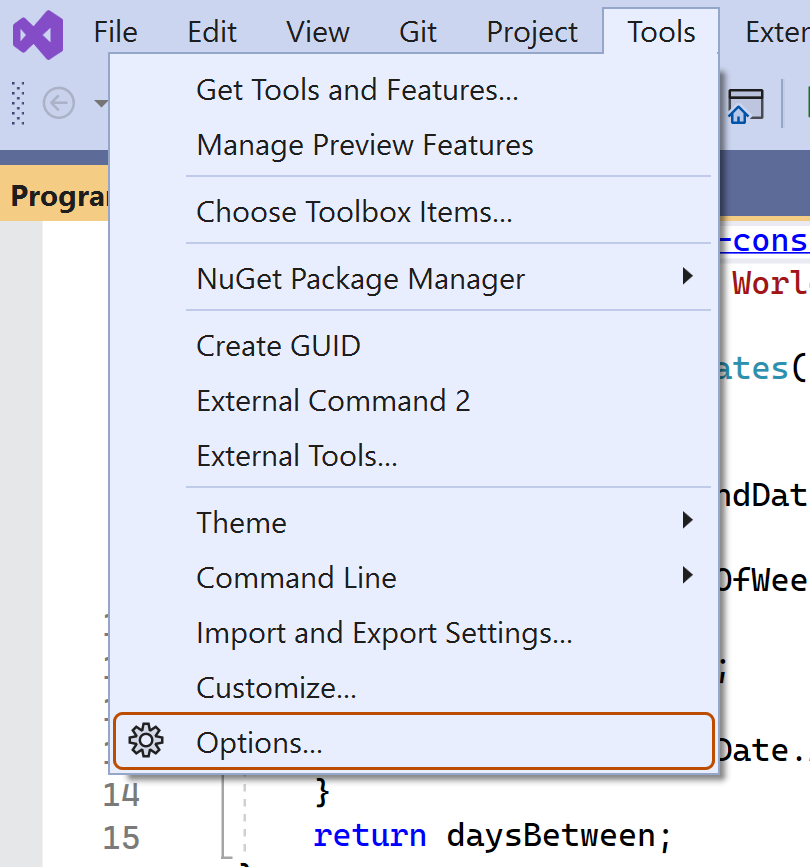
In the Visual Studio menu bar, under Tools, click Options.
-
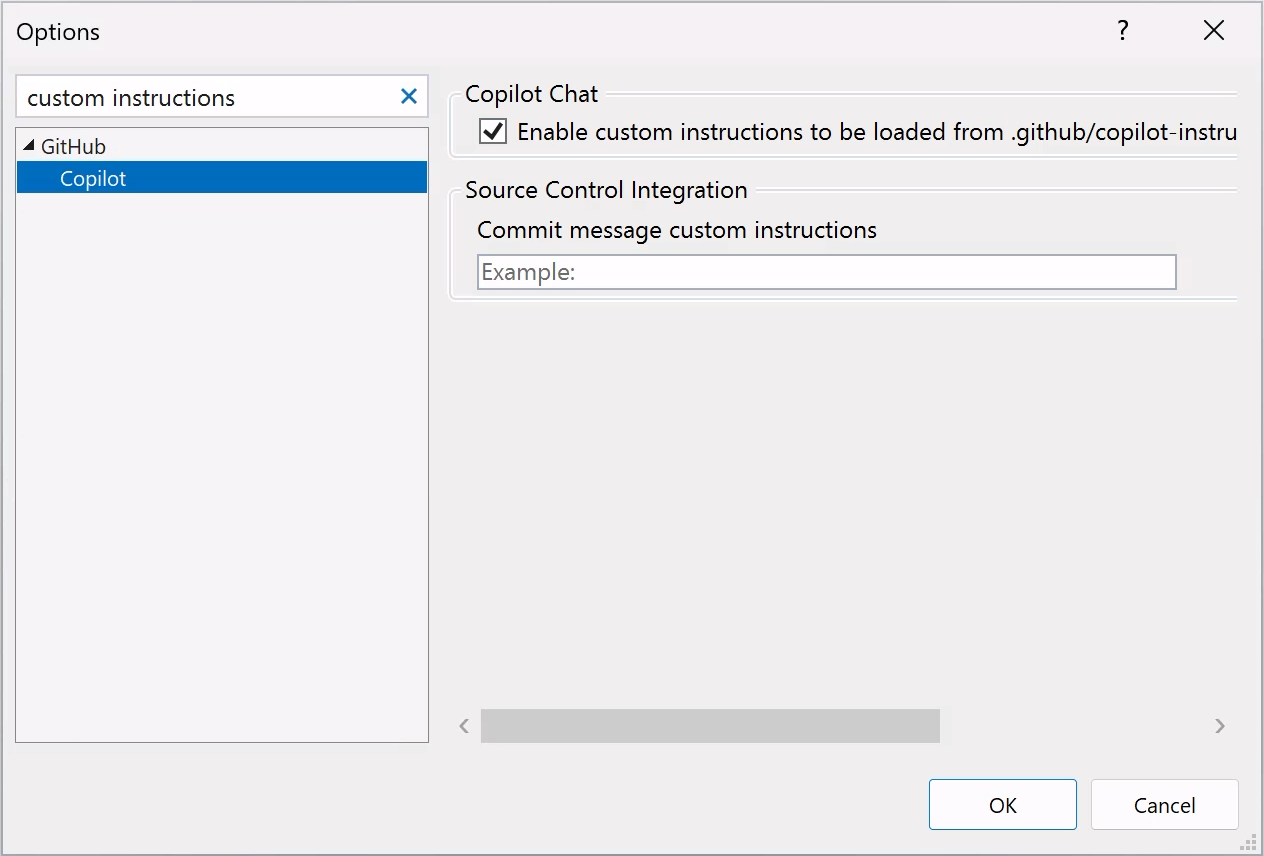
In the "Options" dialog, type
custom instructionsin the search box, then click Copilot. -
Select or clear the checkbox for Enable custom instructions to be loaded from .github/copilot-instructions.md files and added to requests.


Enabling or disabling custom instructions for Copilot code review
Custom instructions are enabled for Copilot code review by default but you can disable, or re-enable, them in the repository settings on GitHub.com. This applies to Copilot's use of custom instructions for all code reviews it performs in this repository.
-
On GitHub, navigate to the main page of the repository.
-
Under your repository name, click Settings. If you cannot see the "Settings" tab, select the dropdown menu, then click Settings.
-
In the "Code & automation" section of the sidebar, click Copilot, then Code review.
-
Toggle the “Use custom instructions when reviewing pull requests” option on or off.
Using prompt files
Note
- Copilot prompt files are in public preview and subject to change. Prompt files are only available in VS Code, Visual Studio, and JetBrains IDEs. See About customizing GitHub Copilot responses.
- For community-contributed examples of prompt files for specific languages and scenarios, see the Awesome GitHub Copilot Customizations site.
Prompt files let you build and share reusable prompt instructions with additional context. A prompt file is a Markdown file, stored in your workspace, that mimics the existing format of writing prompts in Copilot Chat (for example, Rewrite #file:x.ts). You can have multiple prompt files in your workspace, each of which defines a prompt for a different purpose.
Creating prompt files
-
Add a prompt file, including the
.prompt.mdfile name extension inside the.github/promptsfolder in the root of the repository. The name can contain alphanumeric characters and spaces and should describe the purpose of the prompt information the file will contain. -
Write the prompt instructions, using Markdown formatting.
You can reference other files in the workspace by using Markdown links—for example,
[index](../../web/index.ts)—or by using the#file:'../../web/index.ts'syntax. Paths are relative to the prompt file. Referencing other files allows you to provide additional context, such as API specifications or product documentation.
For more information about prompt files, see Use prompt files in Visual Studio in the Visual Studio documentation.
Further reading
- Support for different types of custom instructions
- Customization library—a curated collection of examples
- Using custom instructions to unlock the power of Copilot code review
This version of this article is for using repository custom instructions in JetBrains IDEs. Click the tabs above for instructions on using custom instructions in other environments.
Introduction
Repository custom instructions let you provide Copilot with repository-specific guidance and preferences. For more information, see About customizing GitHub Copilot responses.
Prerequisites for repository custom instructions
-
You must have a custom instructions file (see the instructions below).
-
The latest version of the Copilot extension must be installed in your JetBrains IDE.
Creating custom instructions
JetBrains IDEs support a single .github/copilot-instructions.md custom instructions file stored in the repository, and a locally stored global-copilot-instructions.md file.
You can create the .github/copilot-instructions.md file in your repository using the Copilot settings page, or you can create the file manually.
Whitespace between instructions is ignored, so the instructions can be written as a single paragraph, each on a new line, or separated by blank lines for legibility.
Using the settings page
- In your JetBrains IDE, click the File menu (Windows), or the name of the application in the menu bar (macOS), then click Settings.
- In the left sidebar click Tools, click GitHub Copilot, then click Customizations.
- Under "Copilot Instructions", click Workspace or Global to choose whether the custom instructions apply to the current workspace or all workspaces.
Manually creating a workspace custom instructions file
-
In the root of your repository, create a file named
.github/copilot-instructions.md.Create the
.githubdirectory if it does not already exist. -
Add natural language instructions to the file, in Markdown format.
Once saved, these instructions will apply to the current workspace in JetBrains IDEs that you open with Copilot enabled.
Manually creating a global custom instructions file
To apply the same instructions across all workspaces in JetBrains IDEs, you can create a global custom instructions file on your local machine.
-
Open your file explorer or terminal.
-
Navigate to the appropriate location for your operating system:
- macOS:
/Users/YOUR-USERNAME/.config/github-copilot/intellij/ - Windows:
C:\Users\YOUR-USERNAME\AppData\Local\github-copilot\intellij\
- macOS:
-
Create a file named
global-copilot-instructions.mdin that directory. -
Add your custom instructions in natural language, using Markdown format.
Once saved, these instructions will apply globally across all workspaces in JetBrains IDEs that you open with Copilot enabled.
Custom instructions in use
The instructions in the file(s) are available for use by Copilot as soon as you save the file(s). Instructions are automatically added to requests that you submit to Copilot.
Custom instructions are not visible in the Chat view or inline chat, but you can verify that they are being used by Copilot by looking at the References list of a response in the Chat view. If custom instructions were added to the prompt that was sent to the model, the .github/copilot-instructions.md file is listed as a reference. You can click the reference to open the file.
Using prompt files
Note
- Copilot prompt files are in public preview and subject to change. Prompt files are only available in VS Code, Visual Studio, and JetBrains IDEs. See About customizing GitHub Copilot responses.
- For community-contributed examples of prompt files for specific languages and scenarios, see the Awesome GitHub Copilot Customizations site.
Prompt files let you build and share reusable prompt instructions with additional context. A prompt file is a Markdown file, stored in your workspace, that mimics the existing format of writing prompts in Copilot Chat (for example, Rewrite #file:x.ts). You can have multiple prompt files in your workspace, each of which defines a prompt for a different purpose.
When writing prompt instructions, you can reference other files in the workspace by using Markdown links—for example, [index](../../web/index.ts)—or by using the #file:../../web/index.ts syntax. Paths are relative to the prompt file. Referencing other files allows you to provide additional context, such as API specifications or product documentation.
Once prompt files are saved, their instructions will apply to the current workspace in JetBrains IDEs that you open with Copilot enabled.
Creating prompt files using the command line
- Create the
.github/promptsdirectory if it doesn't already exist in your workspace. This directory will be the location for your prompt files. - Create a prompt file in the
.github/promptsdirectory. The prompt file name can contain alphanumeric characters and spaces and should describe the purpose of the prompt information the file will contain. The file name must end with the.prompt.mdfile name extension, for exampleTESTPROMPT.prompt.md. - Write the prompt instructions using Markdown formatting, and save the file.
Creating prompt files using the settings page
- In your JetBrains IDE, click the File menu (Windows), or the name of the application in the menu bar (macOS), then click Settings.
- Under Tools, under GitHub Copilot, click Edit Settings.
- Under "Settings Categories", click Customizations.
- Under "Prompt Files", click Workspace, to create a prompt file in your workspace.
- Enter a name for the prompt file, excluding the
.prompt.mdfile name extension. The prompt file name can contain alphanumeric characters and spaces and should describe the purpose of the prompt information the file will contain. - Click Ok to save the prompt file name.
- Write the prompt instructions using Markdown formatting, and save the file.
Using prompt files
-
In the chat input box, type
/followed by the name of the prompt file. For example,/TESTPROMPT. -
Optionally, attach additional files, to provide more context.
-
Optionally, type additional information in the chat prompt box.
Whether you need to do this or not depends on the contents of the prompt you are using.
-
Submit the chat prompt.
Further reading
- Support for different types of custom instructions
- Customization library—a curated collection of examples
- Using custom instructions to unlock the power of Copilot code review
This version of this article is for using repository custom instructions in Xcode. Click the tabs above for instructions on using custom instructions in other environments.
Introduction
Repository custom instructions let you provide Copilot with repository-specific guidance and preferences. For more information, see About customizing GitHub Copilot responses.
Prerequisites for repository custom instructions
-
You must have a custom instructions file (see the instructions below).
-
The latest version of the Copilot extension must be installed in Xcode.
Creating custom instructions
Xcode supports a single .github/copilot-instructions.md custom instructions file stored in the repository.
You can create a custom instructions file in your repository via the Copilot settings page.
Whitespace between instructions is ignored, so the instructions can be written as a single paragraph, each on a new line, or separated by blank lines for legibility.
- Open the GitHub Copilot for Xcode application.
- At the top of the application window, under Settings, click Advanced.
- To the right of "Custom Instructions", click Current Workspace or Global to choose whether the custom instructions apply to the current workspace or all workspaces.
Custom instructions in use
The instructions in the file(s) are available for use by Copilot as soon as you save the file(s). Instructions are automatically added to requests that you submit to Copilot.
Custom instructions are not visible in the Chat view or inline chat, but you can verify that they are being used by Copilot by looking at the References list of a response in the Chat view. If custom instructions were added to the prompt that was sent to the model, the .github/copilot-instructions.md file is listed as a reference. You can click the reference to open the file.
Further reading
- Support for different types of custom instructions
- Custom instructions—a curated collection of examples
- Using custom instructions to unlock the power of Copilot code review
Note
This feature is currently in public preview and is subject to change.
This version of this article is for using repository custom instructions in Eclipse. Click the tabs above for instructions on using custom instructions in other environments.
Introduction
Repository custom instructions let you provide Copilot with repository-specific guidance and preferences. For more information, see About customizing GitHub Copilot responses.
Prerequisites for repository custom instructions
-
You must have a custom instructions file (see the instructions below).
-
The latest version of the Copilot extension must be installed in Eclipse.
Creating custom instructions
Eclipse supports two types of repository custom instructions: workspace and project custom instructions.
To create a workspace custom instructions file, you can use the Copilot settings page. To create a project custom instructions file, you can create the file manually in the project directory.
Whitespace between instructions is ignored, so the instructions can be written as a single paragraph, each on a new line, or separated by blank lines for legibility.
Creating a workspace custom instructions file
- To open the Copilot Chat panel, click the Copilot icon () in the status bar at the bottom of Eclipse.
- From the menu, select "Edit preferences".
- In the left pane, expand GitHub Copilot and click Custom Instructions.
- Select Enable workspace instructions.
- In the "Workspace" section, under "Set custom instructions to guide Copilot's code suggestions in this workspace", add natural language instructions to the file, in Markdown format.
Creating a project custom instructions file
- In the root of your project directory, create a file named
.github/copilot-instructions.md. - Add your custom instructions in natural language, using Markdown format.
Once saved, these instructions will apply to the current project in Eclipse that you open with Copilot enabled.
Custom instructions in use
The instructions in the file(s) are available for use by Copilot as soon as you save the file(s). Instructions are automatically added to requests that you submit to Copilot.
Further reading
- Support for different types of custom instructions
- Custom instructions—a curated collection of examples