Présentation
Vous pouvez lancer des sessions Agent cloud Copilot depuis plusieurs endroits sur GitHub. Une fois qu’une session est démarrée, vous pouvez suivre sa progression, l’orienter avec des prompts de suivi et itérer sur la pull request obtenue, le tout sans quitter le navigateur.
Pour plus d’informations sur Agent cloud Copilot, consultez À propos de GitHub Copilot agent cloud.
Vous pouvez également démarrer des agents développés par des partenaires à partir de ces mêmes points d’entrée en utilisant applications d’agent. Pour plus d’informations, consultez « Utilisation d’applications d’agent ».
Démarrage d’une session à partir de l’onglet ou du panneau agents
Vous pouvez démarrer des sessions à partir de l’onglet Agents et du panneau Agents. La seule différence est le point d’entrée : une fois que vous voyez le formulaire « Nouvelle tâche de l’agent », les étapes sont identiques.
-
Ouvrez le panneau ou l’onglet agents :
- Ouvrez l' onglet Agents dans un référentiel.
- Accédez à la page des assistants : rendez-vous sur github.com/copilot/agents. Vous pouvez également y accéder en ouvrant le panneau des assistants, puis en cliquant sur Afficher tout.
- Ouvrez le panneau des assistants : cliquez sur dans la barre de navigation en haut à droite de GitHub.
-
À l’aide du menu déroulant dans le champ de saisie, sélectionnez le référentiel dans lequel vous souhaitez Copilot travailler.
-
Saisissez une invite décrivant votre demande. Vous pouvez également ajouter des entrées visuelles telles que des captures d’écran ou des maquettes d’interface utilisateur en collant, en faisant glisser ou en chargeant une image. Fichiers pris en charge : image/png, image/jpeg, image/gif, image/webp.
Par exemple :
Implement a user friendly message for common errors.Si vous souhaitez Copilot ouvrir une pull request, vous pouvez le demander dans votre invite, par exemple
Open a pull request to implement a user friendly message for common errors. -
Si vous le souhaitez, sélectionnez une branche de base pour les modifications de Copilot. Copilot créera une nouvelle branche basée sur cette branche.
-
Si vous le souhaitez, vous pouvez cliquer sur pour ouvrir le menu déroulant de l'agent, afin d'affecter un agent ou un élément avec un comportement spécialisé et des outils assistant personnalisé. Vous pouvez sélectionner un élément existant assistant personnalisé à partir de votre dépôt, de votre organisation ou de votre entreprise. Vous pouvez également cliquer sur Créer un agent pour créer un nouveau profil d’agent dans votre référentiel et branche sélectionnés. Pour plus d’informations, consultez « Création d’agents personnalisés pour Agent cloud Copilot ».
Remarque
Third-party coding agents are available for all paid Copilot plans.
-
Si vous le souhaitez, vous pouvez utiliser le menu déroulant pour sélectionner le modèle, que Copilot utilisera. Pour plus d’informations, consultez « Modification du modèle IA pour GitHub Copilot agent cloud ».
-
Cliquez ou appuyez sur Entrée.
Copilot démarre une nouvelle session, qui apparaît dans la liste sous la zone d’invite. Copilot travaillera sur la tâche et envoie (push) les modifications de code.
Vous pouvez suivre Copilot le travail et ouvrir une pull request en un clic dans les journaux de session. Pour plus d’informations, consultez « [AUTOTITLE](/copilot/how-tos/copilot-on-github/use-copilot-agents/manage-and-track-agents) ».
Démarrage d’une session à partir du tableau de bord
Vous pouvez demander à Copilot de commencer à travailler depuis la zone de saisie du tableau de bord. Le tableau de bord est votre vue d'ensemble personnalisée de votre activité sur GitHub, visible lorsque vous visitez https://github.com tout en étant connecté.
-
Accédez au tableau de bord à l’adresse https://github.com.
-
Cliquez sur le bouton Tâche .
-
À l’aide du menu déroulant dans le champ de saisie, sélectionnez le référentiel dans lequel vous souhaitez Copilot travailler.
-
Saisissez une invite décrivant votre demande.
Par exemple :
Implement a user friendly message for common errors.Si vous souhaitez Copilot ouvrir une pull request, vous pouvez le demander dans votre invite, par exemple
Open a pull request to implement a user friendly message for common errors. -
Si vous le souhaitez, sélectionnez une branche de base pour la pull request de Copilot. Copilot créera une nouvelle branche basée sur cette branche.
-
Si vous le souhaitez, vous pouvez cliquer sur pour ouvrir le menu déroulant de l'agent, afin d'affecter un agent ou un élément avec un comportement spécialisé et des outils assistant personnalisé. Vous pouvez sélectionner un élément existant assistant personnalisé à partir de votre dépôt, de votre organisation ou de votre entreprise. Vous pouvez également cliquer sur Créer un agent pour créer un nouveau profil d’agent dans votre référentiel et branche sélectionnés. Pour plus d’informations, consultez « Création d’agents personnalisés pour Agent cloud Copilot ».
Remarque
Third-party coding agents are available for all paid Copilot plans.
-
Cliquez sur Envoyer maintenant ou appuyez surRetour.
Vous accédez à l’onglet Agents et Copilot démarrez une nouvelle session, qui s’affiche dans la liste « Sessions récentes » sous la zone d’invite. Copilot travaillera sur la tâche et envoie (push) les modifications de code.
Remarque
Si vous avez activé la nouvelle expérience de tableau de bord en préversion des fonctionnalités, la nouvelle session s’affiche dans « Sessions de l’agent » sous la zone d’invite de votre tableau de bord. Pour plus d’informations, consultez « Tableau de bord personnel ».
À partir de Discussion avec Copilot
Lorsque vous démarrez une tâche depuis Discussion avec Copilot, la nouvelle session Agent cloud Copilot inclut le contexte de votre conversation en cours. Cela signifie que vous n’avez pas besoin de répéter les détails que vous avez déjà partagés avec Copilot dans votre prompt /task.
-
Ouvrez GitHub Copilot Chat sur GitHub.com.
-
Tapez
/taskpour demander à Copilot de créer une pull request et donnez des détails sur ce que vous souhaitez que Copilot modifie.Par exemple :
/task Create a pull request to put backticks around file names and variables in output. -
Si vous le souhaitez, sélectionnez une branche de base pour la pull request de Copilot. Copilot créera une nouvelle branche basée sur cette branche, puis poussera les modifications vers une pull request ciblant cette branche.
-
Si vous le souhaitez, vous pouvez cliquer sur pour ouvrir le menu déroulant de l'agent, afin d'affecter un agent ou un élément avec un comportement spécialisé et des outils assistant personnalisé. Vous pouvez sélectionner un élément existant assistant personnalisé à partir de votre dépôt, de votre organisation ou de votre entreprise. Vous pouvez également cliquer sur Créer un agent pour créer un nouveau profil d’agent dans votre référentiel et branche sélectionnés. Pour plus d’informations, consultez « Création d’agents personnalisés pour Agent cloud Copilot ».
Remarque
Third-party coding agents are available for all paid Copilot plans.
-
Cliquez ou appuyez sur Entrée.
Copilot démarre une nouvelle session, qui apparaît dans la liste sous la zone d’invite. Copilot travaillera sur la tâche et poussera les modifications dans sa pull request, puis vous ajoutera en tant que réviseur une fois terminé, ce qui déclenchera une notification.
Affectation d’un problème à Copilot
Vous pouvez demander Copilot à commencer à travailler sur un problème en affectant le problème à Copilot. Copilot se mettra à travailler sur la tâche, ouvrira une pull request, puis vous demandera une relecture une fois ce travail terminé.
Remarque
Cette fonctionnalité est en cours de développement préversion publique et est susceptible de changer.
-
Sur GitHub, accédez à la page principale du référentiel.
-
Sous le nom de votre référentiel, cliquez sur Problèmes.

-
Ouvrez le problème auquel vous souhaitez affecter Copilot.
-
Dans le menu de droite, cliquez sur Destinataires.
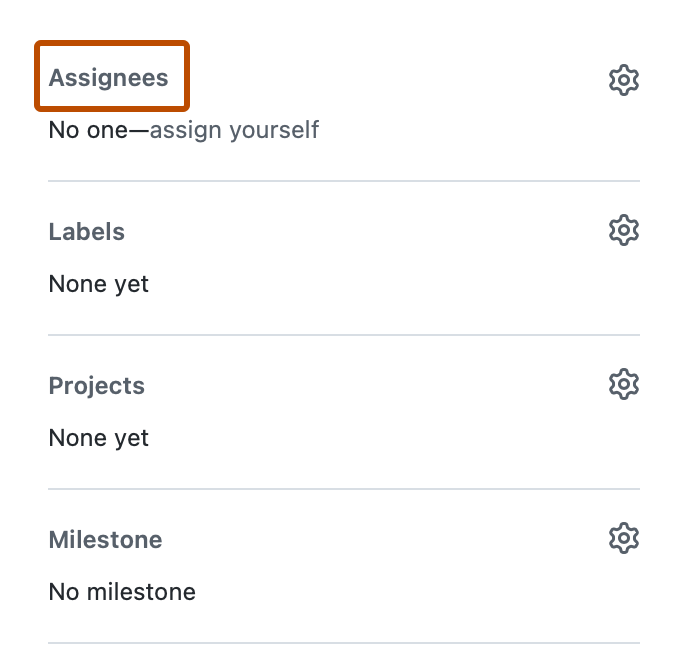
-
Cliquez sur Copilot dans la liste des assignés.
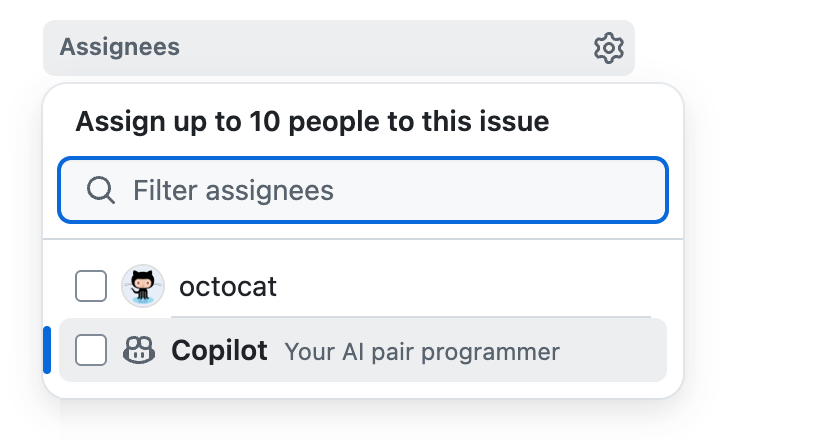
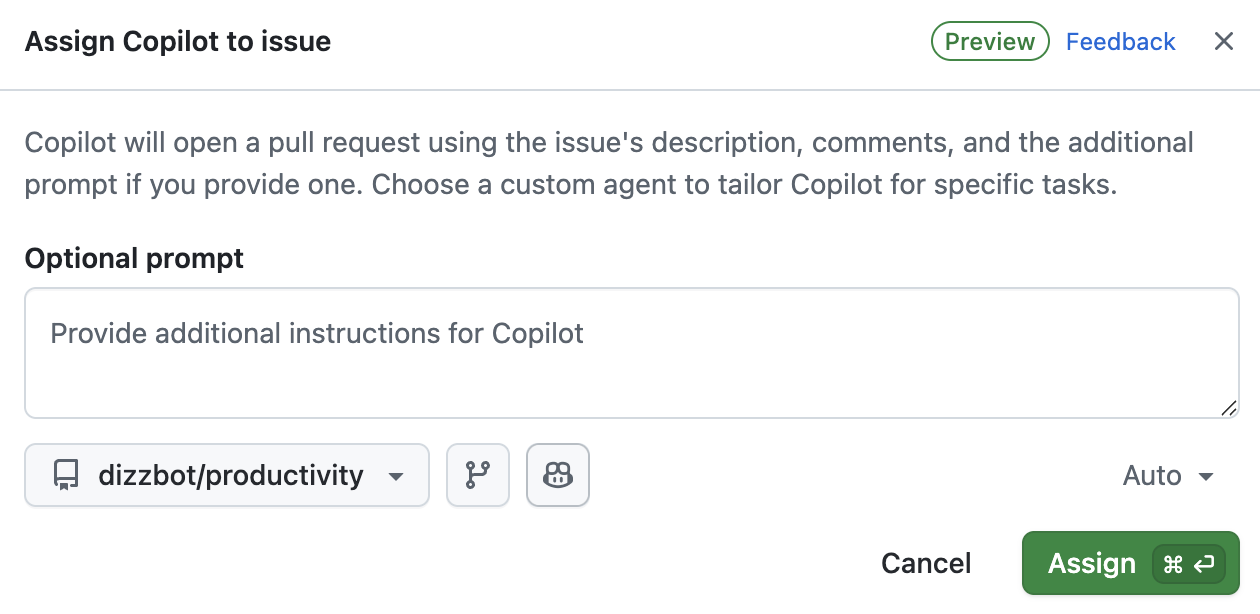
Des options supplémentaires s'affichent.
-
Dans le champ d’invite facultatif , vous pouvez ajouter des instructions spécifiques pour Copilot. Ajoutez un contexte, des contraintes ou des exigences spécifiques qui vous aideront Copilot à comprendre et à terminer la tâche.
Par exemple, vous pouvez inclure des instructions concernant les modèles ou les cadres de codage spécifiques à utiliser, les exigences en matière de tests, les préférences en matière de style de code, les fichiers ou répertoires qui doivent ou ne doivent pas être modifiés.
En plus des détails que vous fournissez ici, Copilot utilisez toutes les instructions personnalisées qui ont été configurées pour le référentiel cible. Consultez « Ajout d’instructions personnalisées de référentiel pour GitHub Copilot ».
-
Vous pouvez utiliser les menus déroulants dans la boîte de dialogue pour modifier le référentiel dans lequel Copilot travaillera et la branche à partir de laquelle il bifurquera.
Tous les référentiels dans lesquels vous avez ** au moins** accès de lecture sont affichés dans le menu déroulant du référentiel. Toutefois, vous ne pouvez sélectionner un référentiel que si vous y avez accès en écriture , et s’il Agent cloud Copilot est activé pour ce référentiel.
Si vous sélectionnez un référentiel dans une autre organisation que l’organisation source du problème ou si vous sélectionnez un dépôt public lorsque le problème se trouve dans un référentiel privé, un avertissement s’affiche.
Si vous ne spécifiez pas de référentiel, Copilot fonctionne dans le même référentiel que le problème. Si vous ne spécifiez pas de branche, Copilot fonctionne à partir de la branche par défaut du référentiel sélectionné.
Conseil
Lorsque vous attribuez un problème à Copilot, il est envoyé le titre, la description du problème, les commentaires qui existent actuellement et toutes les instructions supplémentaires que vous fournissez. Une fois le problème attribué, Copilot ne sera pas informé des nouveaux commentaires, et donc ne réagira pas à ceux-ci. Si vous avez plus d’informations ou des modifications à l’exigence d’origine, ajoutez-le en tant que commentaire dans la requête de tirage que Copilot déclenche.
-
Si vous le souhaitez, vous pouvez cliquer sur pour ouvrir le menu déroulant de l'agent, afin d'affecter un agent ou un élément avec un comportement spécialisé et des outils assistant personnalisé. Vous pouvez sélectionner un élément existant assistant personnalisé à partir de votre dépôt, de votre organisation ou de votre entreprise. Vous pouvez également cliquer sur Créer un agent pour créer un nouveau profil d’agent dans votre référentiel et branche sélectionnés. Pour plus d’informations, consultez « Création d’agents personnalisés pour Agent cloud Copilot ».
Remarque
Third-party coding agents are available for all paid Copilot plans.
-
Si vous le souhaitez, vous pouvez utiliser le menu déroulant pour sélectionner le modèle, que Copilot utilisera. Pour plus d’informations, consultez « Modification du modèle IA pour GitHub Copilot agent cloud ».


Vous pouvez également affecter des problèmes à Copilot depuis d'autres emplacements sur GitHub.com :
- Dans la liste des problèmes sur la page Problèmes d’un dépôt .
- Lors de l’affichage d’un problème dans GitHubProjets.
Amorçage d’un nouveau référentiel
Lors de la création d’un dépôt, vous pouvez demander à Copilot d'amorcer le nouveau dépôt en entrant une invite.
-
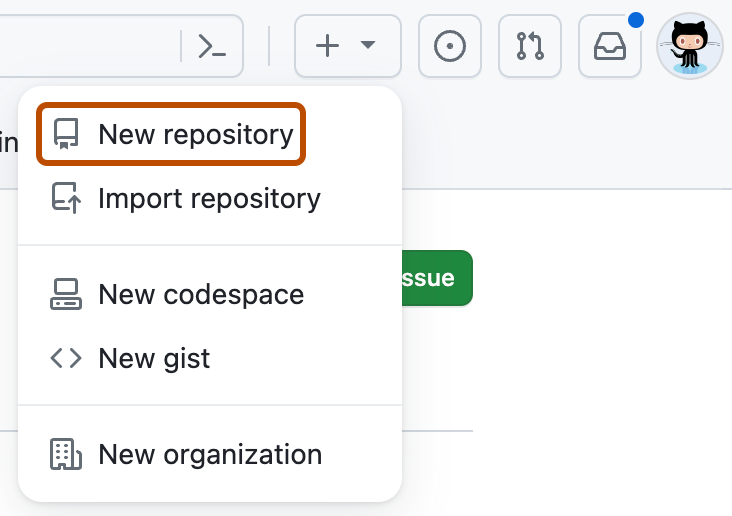
Dans le coin supérieur droit de n’importe quelle page, sélectionnez sur , puis cliquez sur Nouveau référentiel.
-
Utilisez le menu déroulant Propriétaire pour sélectionner le compte auquel vous voulez donner la propriété du dépôt.

-
Dans le champ Invite , entrez une invite décrivant ce que vous souhaitez Copilot générer.
Par exemple,
Create a Rust CLI for converting CSV spreadsheets to Markdown1. Cliquez sur Créer le dépôt.


Copilot ouvre immédiatement un brouillon de demande de tirage. Copilot travaillera sur la tâche et poussera les modifications dans sa pull request, puis vous ajoutera en tant que réviseur une fois terminé, ce qui déclenchera une notification.
Résolution d’une exécution de flux de travail défaillante GitHub Actions
Lorsqu’une exécution de workflow GitHub Actions échoue sur une branche de pull request, vous pouvez demander à Copilot d’examiner et de corriger le problème.
-
Sur GitHub, accédez à la page de travail d’exécution de flux de travail défaillante.
-
Cliquez sur le bouton Corriger avec Copilot.
Copilot démarrera une nouvelle session, examinera la cause de l’échec et appliquera un correctif sur votre branche.
Poursuite du travail sur une pull request
Vous pouvez mentionner @copilot dans un commentaire sur n’importe quelle pull request pour demander à Copilot d’apporter des modifications. Cela fonctionne sur les demandes de tirage créées par Copilot et sur les demandes de tirage que vous ou d’autres avez créées.
Par défaut, Copilot envoie les commits directement dans la branche de pull request. Pour créer une pull request distincte, décrivez cela dans votre commentaire. Vous pouvez également consulter la branche et envoyer des modifications vous-même.
Révisez les commentaires par lots au lieu de les soumettre individuellement. Lors de l'envoi d'un commentaire de demande de fusion (pas d'une révision ni d'un commentaire de révision) via l'interface GitHub web, sélectionnez un modèle avec le sélecteur de modèle. Copilot utilise le modèle de la demande de fusion d'origine par défaut.
Copilot répond uniquement aux commentaires des personnes qui ont accès en écriture au référentiel.
Lorsque Copilot démarre une nouvelle session en réponse à votre commentaire, une réaction emoji en forme d'yeux s’affiche 👀 sur le commentaire. Un événement « Copilot a démarré le travail » s’affiche dans la chronologie des demandes de tirage.

Copilot mémorise le contexte des sessions antérieures sur la même pull request, de sorte que les requêtes de suivi sont plus rapides et plus fiables. Si la demande de tirage a été créée par un assistant personnalisé, la mention @copilot continue d’utiliser ce même agent.
Résolution des conflits de fusion
Vous pouvez solliciter Copilot pour résoudre les conflits de fusion sur un pull request de deux façons :
- À l’aide du bouton « Corriger avec Copilot » : Si un pull request comporte des conflits de fusion, cliquez sur le bouton « Corriger avec Copilot » qui s’affiche dans la zone de fusion.
- Utilisation d’une @copilot mention : Mentionnez
@copilotdans un commentaire sur le pull request et demandez-lui de résoudre les conflits, par exemple, «@copilot résoudre les conflits de fusion sur ce PR ».
Copilot analyse les modifications en conflit, les résout et vérifie que le build, les tests et le linter réussissent toujours. Il demande ensuite votre révision pour vous permettre de confirmer la résolution avant la fusion.
Exécuter Agent cloud Copilot automatiquement avec automations
Vous pouvez configurer automations pour exécuter Agent cloud Copilot automatiquement, selon une planification définie ou en réponse à des événements tels que l’ouverture d’un ticket. Vous créez et gérez automations à partir du Automations volet sous l’onglet Agents d’un référentiel. Pour plus d’informations, consultez « Création d’automatisations avec Copilot agent cloud ».
Gestion des GitHub Actions exécutions de flux de travail
Par défaut, GitHub Actions les flux de travail ne s’exécutent pas automatiquement lorsque Copilot les modifications sont envoyées à une demande de tirage (pull request).
GitHub Actions Les flux de travail peuvent être privilégiés et avoir accès à des secrets sensibles. Inspectez les modifications proposées dans la demande de tirage et assurez-vous que vous êtes à l’aise pour exécuter vos workflows sur la branche de la demande de tirage. Vous devez être particulièrement averti des modifications proposées dans le .github/workflows/ répertoire qui affectent les fichiers de flux de travail.
Pour permettre aux workflows GitHub Actions de s'exécuter, cliquez sur le bouton Approuver et exécuter les workflows dans la boîte de fusion de la pull request.

Si vous le souhaitez, vous pouvez configurer Agent cloud Copilot pour permettre GitHub Actions aux flux de travail de s’exécuter sans intervention humaine. Pour plus d’informations, consultez Configuration des paramètres pour GitHub Copilot agent cloud.
Faire des commentaires sur Copilot.
Utilisez les boutons de commentaires sur les pull requests Copilot et les commentaires pour évaluer le résultat. Vos commentaires aident à améliorer la qualité de Copilot.
- Sur une demande de fusion ou un commentaire Copilot, cliquez sur le bouton pouce levé (👍) ou pouce baissé (👎).
- Si vous cliquez sur le bouton vers le bas, sélectionnez éventuellement une raison et laissez un commentaire, puis cliquez sur Envoyer des commentaires.